

Video: Faux Watercolor Technique for Background Stamps
Maria Willis
Hi everybody! It’s Maria here and today I’ve got a really fun and easy technique to share with you. I’m calling it a Faux Watercolor Technique and I’ll be showing how to do it with your background stamps. This technique will work best with stamps that have some surface area to the design vs. being detailed stamp designs with fine lines. For today’s cards I’ve decided to use the Circular Grid Bold Prints as well as the Water Ripples Bold Prints.
I’ve made a video sharing how to do this technique so if you love a video then here you go!
If you are having trouble viewing this video, please watch HERE on YouTube.
For this technique you will need to use a stamp positioner. I placed the Circular Grid Bold Prints stamp in my MISTI and then placed a piece of A2 sized watercolor paper in the center of it. You can see how I aligned it for perfect placement in the video. Next, I randomly applied ink to the stamp using Lemon Drop Reactive Ink. I made sure not to cover the whole background. Next, I spritzed the stamp lightly with water and stamped it onto my watercolor paper. This gave me a loose, watercolor effect within the definition of the stamped image.

I cleaned my stamp, re-inked with Creamsicle ink, spritzed lightly and stamped again. I repeated these steps again with Fruit Punch ink and finished my card off using the Happy Thanks Stamp & Cut XL.

For my second card I used the same technique that I did on the first card.

This time I used Key Lime Fizz, Pool Party and Blue Raspberry Reactive Inks.

To finish this card off I again used the Happy Thanks Stamp & Cut XL.

Now comes the really fun part! I decided to try this same technique on black watercolor paper and it came out amazing! I added one additional step to make the colors pop. Before applying color using my Reactive Inks, I added a white basecoat using Unicorn White Pigment Ink. I did not spritz this ink with water before stamping as I wanted to make sure I laid down a solid layer of white for my colors to sit on.
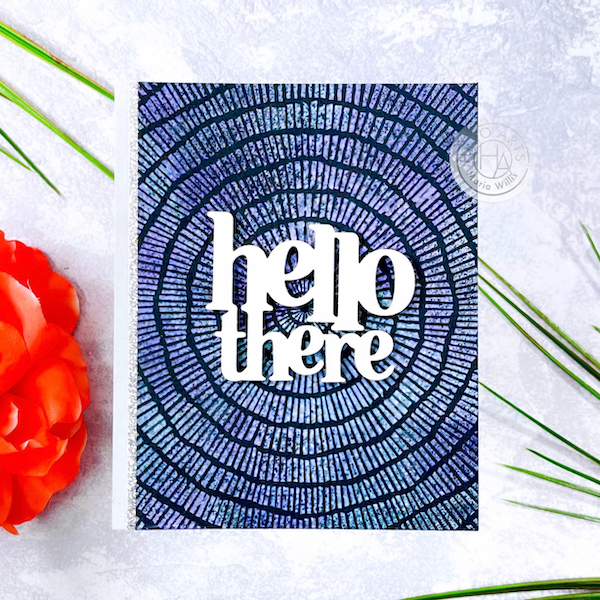
After stamping in white I followed the same steps as I had on the regular watercolor cardstock. For each color of ink I first inked the stamp, lightly spritzed the stamp, and then stamped. On this card I used Splash, Blue Hawaii and Purple Galaxy.

I finished my card off with a white die cut from the Hello There Stamp & Cut.

My next card is one you might recognize as I shared it here last month (check out that blog post HERE. I used this very same technique on this card but I used the Water Ripples Bold Prints stamp instead. This stamp works really well with this technique because it has large areas where ink can be applied.

My final card was stamped on black watercolor paper. After stamping a base layer in Unicorn White, I added color in Splash, Blue Hawaii and Taffy Reactive Inks.
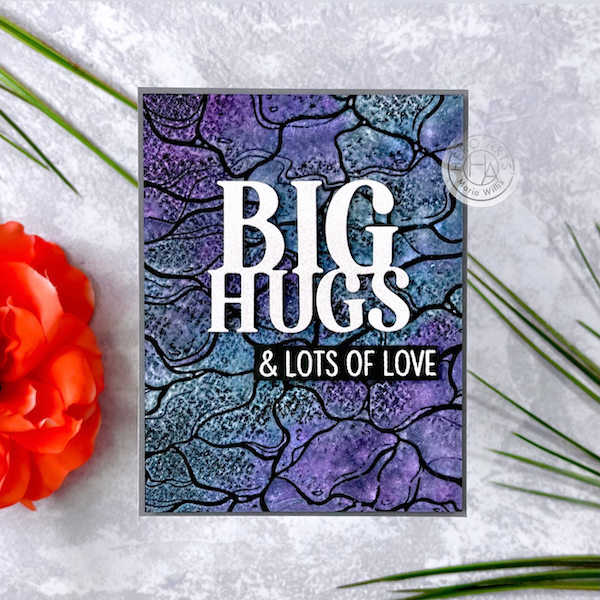
I love how well you can see the detail and variations in color with this stamp.

To finish this card off I used the Big Hugs Stamp & Cut.

TIPS FOR SUCCESS WITH THE FAUX WATERCOLOR BACKGROUND TECHNIQUE:
- Select a stamp with a lot of surface area vs a detailed stamp with fine lines.
- Stamp starting with your lightest color and move towards your darker colors (you can always add more color but once that dark layer is applied it’s hard to remove.)
- Clean your stamp between layers of color and especially after using pigment ink.
- When stamping on black watercolor cardstock use Unicorn White Pigment Ink as your first layer without spritzing it.
- Spritz a light mist of water before stamping with Reactive Inks. If you apply too much water it could cause the ink to run/bleed and you may lose definition in your stamped image.
- Select colors that are side by side on the color wheel so that they will blend well together.
- Enjoy the process and have fun!
Ok, that is all for today you guys! I hope you all have a great week and that you might have time to try out this technique. If you do I’d love to hear how it went and which stamp sets you’ve used. Just leave a comment below!
Have an awesome day!

|


This looks like such a fun technique! I really love the background on the goldfish card. I’ll have to give this one a try – thanks for sharing!
Oooh fishes! Lovely
Great backgrounds! I’m dying to try the black c/s version!
Wonderful artsy look to the variety of creations.
Melissa
“Sunshine HoneyBee”
Oh my gosh, I loved this technique. Like you, the last one was amazing. I’m going to try that as it’s another use for background stamps that may seem like they aren’t used enough. Thank you so much!