Posted by Channin Pelletier
on November 02, 2021


Hello, friends! It’s Channin here with a new card and video! Today I create a very "cool" see-through card featuring the November My Monthly Hero Kit ! Watch to see how I create my own snowy glittery acetate sheet and then build my see-through card base to make a perfect frosty scene for my snowman!!
(If you are having trouble viewing this video, please try watching it HERE on YouTube.)
To create this card I first created my own specialty acetate sheet with a laminator pouch and a laminator. I did this by first sprinkling white embossing powder , Snowfall Glitter and Stardust Sequins (from the July 2021 My Monthly Hero Kit ) inside the laminator pouch. I then closed the pouch and ran it through my laminator. The heat from the laminator melts the embossing powder which mimics the look of snow and the sealed pouch keeps the glitter and sequins suspended in place.

Next, I trimmed the laminated sheet down to create a 4 1/4” x 7” panel. I then scored and folded the panel at 5 1/2” and ran it through my laminator once more to reinforce the fold.
Next, I ink blended over an A2 (4 1/4” X 5 1/2”) panel of Arctic cardstock with Splash and Blue Hawaii Reactive Inks. I then created my card base by sandwiching the tab of the laminated sheet between the blended panel and an A2 panel of Dove White cardstock, using double-sided tape and Precision Glue to hold everything place.

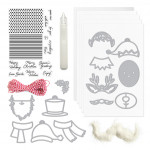
Next, I die cut three of every component I needed to make the snowman (face, top hat and scarf) out of either Dove White cardstock or colored cardstock ( Pitch Black , Cherry , Arctic or Papaya ). I then trimmed the hat ribbon away from the rest of my three Arctic hats and adhered the ribbon to the black hats. Next, I stamped and white heat embossed a sentiment from the stamp set onto one of the black hats. Then I used a small piece of tape to hold the eyes and noses in place on all three of the faces.

Next, I created three bodies using a circle die from the Nesting Circle Infinity Dies set. I then trimmed the bottom portion of the circles off and adhered two snowmen completely together (head + hat + scarf + body) making sure they were both identical to each other. I then adhered one snowman inside my card base and the other on the card front. Lastly, I finished my card by adhering the remaining snowman pieces to the backside of the card front, making sure to line them up with the snowman on the front.
I hope you enjoyed my card and video! Thank you so much for stopping by!

|


7 comments
Awesome card Channin.
I love your beautiful snowswirls and what
a great idea.
Thank you so much for sharing your how-to video,
stay safe and have a wonderful day.
Great idea! Love the snow background!
Cute project. Thanks for the reminder about using laminator pouches. That really creates an interesting background.
cute snowman. Always a favorite of mine.This kit has so many options. I love it. So glad I belong…
Love this card, thank you so much for sharing the video! What a great way to use products and make a fantastic card. I enjoy Channin’s videos and seeing what she creates using Hero Arts kits!!