

-
Products
-
Categories
Menu
-
Products
-
Categories
Video: 80s Flamingo Card with the July 2022 My Monthly Hero Kit
Channin Pelletier

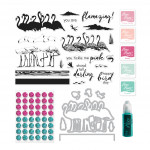
Hello friends!! It’s Channin here and today I’m creating a colorful 80s inspired card featuring the brand new July 2022 My Monthly Hero Kit. Watch the video below to see how I blend and stamp a vibrant landscape and then finish with a cool ombre sentiment.
(If you are having trouble viewing this video, please watch HERE on YouTube.)
To create this card I first die cut a panel of Deluxe Smooth White cardstock with a circle die from the Nesting Circle Infinity Die Set. Next I taped off the lower third of the circle and then ink blended the upper portion in Creamsicle, Taffy, Thistle and Purple Galaxy Reactive Inks to create the sky. When I was finished ink blending the sky I removed the tape and then masked off the sky. With the sky protected, I ink blended the water with Pool Party and Blue Raspberry Reactive Inks. When I finished blending the water I removed the tape and then splattered water over the sky to make water spots to resemble stars.

Next, I stamped the detail layer for the water over the water in Pool Party and Blue Raspberry. I completed my scene by stamping the legs and bodies of the flamingos in Intens-ified Black.
With my scene complete, I created the sentiment. First I arranged “you are” and “flamazing” together in my MISTI to create a single sentiment. I then partially inked up a third of the sentiment in Thistle and stamped it onto white cardstock. I then partially inked up the middle of the sentiment in Taffy and stamped it again. Lastly I inked up the last bit of the sentiment in Creamsicle and stamped again. Next, I inked up the entire sentiment in Embossing & Watermark Ink and stamped over the ombre sentiment. I then poured Clear Embossing Powder over the sentiment and heat set.

With the sentiment stamps still in my MISTI, I placed the stamped sentiment back into my MISTI but this time I pushed the paper up a tiny bit (like 1/16”) to create a dropped shadow. I then stamped the sentiment again in Embossing & Watermark Ink and heat set in Clear Embossing Powder. Next, I ink blended over the sentiment with INTENS-ified Black Ink and then fussy cut the sentiment out. I finished the card by adhering the scene and sentiment to the front of an A2 Dove White Top Folded Card with foam adhesive.
I hope you enjoyed today’s card and video! Thank you so much for stopping by!

|


This is fabulous! Well-done, Channin.
Loved this card with all the different techniques on it. The sentiment was lovely and found it very interesting on how you achieved that look. Thank you, Channin.
This set is so beautiful. I can’t wait to add it to a scrapbook layout. I am definitely going to try to recreate that beautiful card.
Beautiful card made simply. Thanks for teaching the easy techniques.