-
Products
-
Categories
Menu
-
Products
-
Categories
Video: You're The Berry Best
Dana Joy
Hey everyone. It's Dana here with you today. Let's get inspired to create simple spring cards with the new Berry Basket Bundle. Say that three times. LOL
(If you are having trouble viewing this video, please watch HERE on YouTube.)
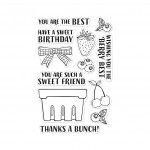
I have to say this card was super easy to create and a lot of fun. To start off, I stamped the images from the Berry Basket Bundle onto Dove White cardstock with Intens-ified Black ink. This ink is perfect for coloring with alcohol markers.

Now it was time to color. I used a few OLO alcohol markers (R0.5, R0.6, R1.5, YG8.3, YG2.5 and YG8.7) to color in the images. I didn't fuss over the color, rather I just kept a simple blend on the fruit. After I colored the fruit, I decided I wanted the basket to be made out of Sand cardstock. I stamped the basket in Intens-ified Black ink onto the Sand cardstock and lightly colored it with my OLO markers (OR7.2 and OR7.6).

Once everything was colored, I used the coordinating dies to cut out the images. Now it was time to build up the card. For an added pop of color, I used a die from the Circle Nesting Infinity Dies to cut a circle out of Cherry cardstock. This gave a nice landing spot for my basket of strawberries.
 For added dimension, I used thin foam tape to pop up the basket and strawberries. A simple sentiment from the stamp set stamped in black ink on the same Sand colored cardstock finished off the card panel. All that was left was to add it to an A2 size card base made from Dove White cardstock. Finishing details were the added faux stitched lines and highlights using a gelly roll pen in size 10.
Thanks for stopping by today. I hope you enjoyed the tutorial and are ready to make your adorable basket full of fruit! See you back here soon.

Click on products to shop:
|


I just received this set and I’m looking forward to creating with it. Thank you for the great ideas. It really is a cute card.