Embossed Butterfly Frames
Jayne Nelson
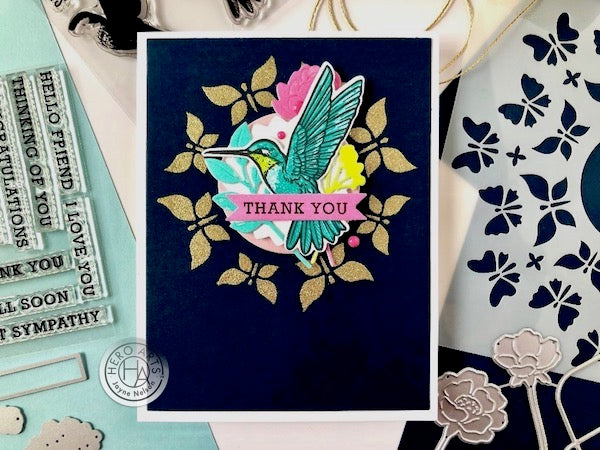
There are many wonderful ways to spotlight an image or a sentiment on a card. Today, I’m highlighting the focal images on a pair of cards by creating simple, embossed frames using the beautiful Butterfly Circle Stencil. By selectively embossing only some of the butterflies, it’s easy to create a round frame that adds charm and texture to a card.

To create the embossed frames, I started by cutting two background panels with a large Nesting Rectangle Die. One at a time, I secured a panel to my work surface with a few pieces of tape to prevent it from moving. Then, I positioned the Butterfly Circle Stencil over the panel, centering the circle opening between the left and right edges. Similarly, I taped the stencil to my desk to ensure that it wouldn’t move. Next, I covered every opening in the stencil except the eight butterflies around the center circle with masking paper. As an extra precaution, I also covered any remaining exposed portions of the background panel.

Using Clear Embossing & Watermark Ink, I carefully tapped the ink pad directly on the stencil, through the butterfly openings, and onto the cardstock. I repeatedly tapped ink over each butterfly until it appeared that each opening was completely wet with embossing ink. Then, I carefully removed the stencil and cardstock from my desk. I embossed the butterflies with Gold Glitter Embossing Powder on a Nautical background to emphasize the gorgeous shine. I embossed the butterflies on an Adriatic background with White Embossing Powder for a lovely contrast. I secured both panels to Dove White Side Folded Cards.

At this point, I created a pair of colorful, layered elements to place at the center of each butterfly frame. I started by cutting circle and scalloped cardstock pieces with the Nesting Circle Infinity Dies and the Line Art Flowers Frame Cuts. I also inked scraps of Dove White cardstock with assorted Reactive Inks and then die cut various small leaves and flowers with the Envelope Accessories and the Bouquet Accessories Fancy Dies.

For a vibrant main image, I stamped a pair of Color Layering Hummingbirds with Intens-ified Black Ink and several Reactive inks and then die cut them with the coordinating dies. Using foam tape, adhesive dots and Precision Glue, I secured the individual elements together and then secured them to each card. I finished both cards with a stamped sentiment from the versatile Sending Love Mail set and a trio of Pink Enamel Dots.

Thanks so much for stopping by today. If you like layered designs, butterflies, or even using stencils, I hope that your are inspired to add an embossed frame to one of your card designs soon.
Wishing you a wonderful, crafty weekend,

|


Beautiful cards Jayne and great idea!
Thank you so much for sharing, stay safe and have a wonderful week.
Wonderful Butterfly stencil & embossing. Ordered done woodblock stamps yesterday and will put the butterfly stencil on my wishlist. Watched Daniel yesterday use a die that I have that came with the Apr Bundle and I’m going to give that a try with the HA reactive inks I have.
Melissa
“Sunshine HoneyBee”