Blog Hop: Easy Light Up Cards + Giveaway!
Hi everybody! It's Maria here and boy do we have something fun in store for you today! Today we are joining together with Pear Blossom Press for a fun blog hop showing how easy it is to use the EZ-Lights with Hero Arts products that you probably already have in your stash.
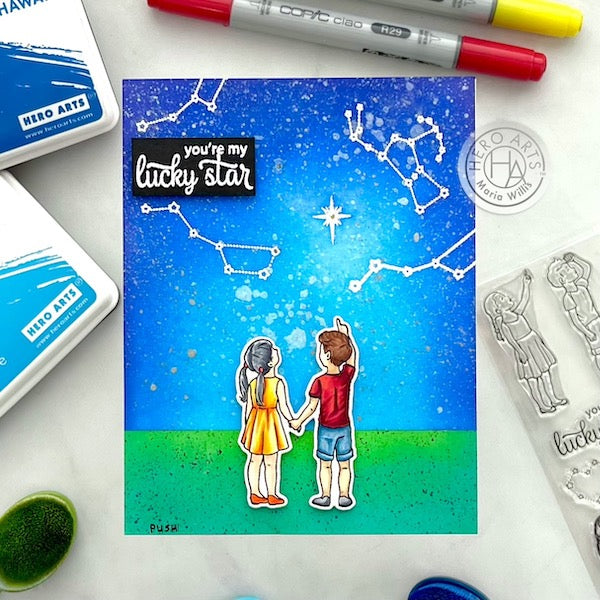
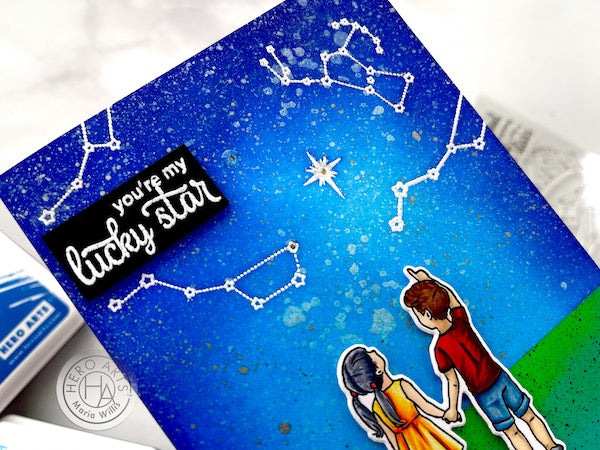
I decided to use the Lucky Star stamp set for my card because I thought that it would be really fun to make the stars light up. I started out by preparing the background of my card. Here's what I did:
- Cut Dove White Cardstock to to 4.25" x 5.5"
- Next, I ink blended using Reactive Inks in Splash, Blue Hawaii, Grape Slush, Green Apple and Blue Raspberry. I masked the background off to create the horizon line while ink blending.
- Sprayed the sky with White Iridescent Shimmer Mist to add sparkle.
- Splattered the sky with Silver Metallic Ink to add extra stars.
- Splattered black ink from a felt tipped pen onto the ground.
- Heat embossed the stars in White Detail Embossing Powder.
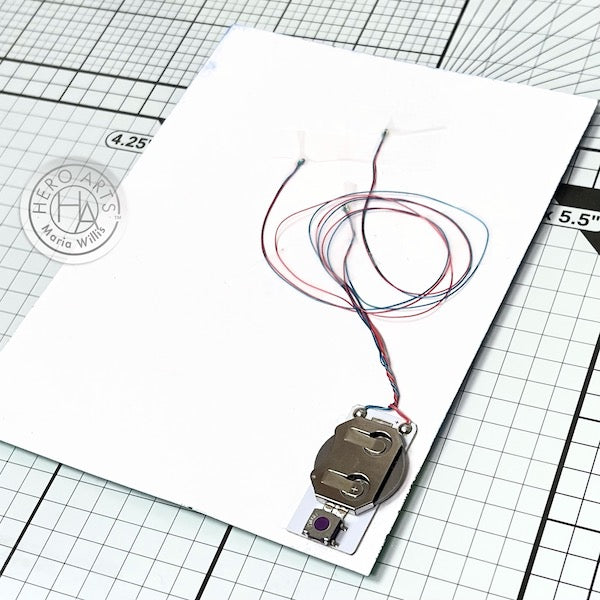
Once the background was prepped I was ready to add my lights to the card. The Pear Blossom Press EZ-Lights come in units that have three lights on them. I chose three places to add my lights and used a craft pick to poke small holes in my paper. You can see below how that looked.
Next, I added Clear Enamel Dots on top of the holes. This will help to radiate the light from the EZ-Lights and give my stars a soft glow. Below you can see how that looks.
The next step is adding the EZ-Lights unit to the back of my panel. I have a few tips for doing this:
- First, carefully uncoil the wires making sure not to break them away from the small, yellow light bulb at the tip of the wires.
- Put your battery into the slot on the main piece of the unit. Press the purple button to make sure your lights light up. If they don't, flip the battery over as you may have placed it upside down.
- Place one lightbulb behind each of the holes/enamel dots and tape securely into place. I used scotch tape.
- Place the unit with battery and button where you want it so that it is easy to press when your card is finished. I used a tape runner to apply adhesive and stick my unit into place.
- TIP: Place your unit so that the battery can be removed from your finished card. This will allow you to remove it so that they battery will not be drained while not in use. Unfortunately, I didn't do this but I wish I had.
- Gently coil the excess wires and tape them to the cardstock so that the unit will remain in place and the wires won't be damaged.
Next, it's time to add a double layer of foam adhesive. The battery unit is thicker than a single layer of foam tape so a double layer is necessary. I was careful not put it on top of my light bulbs or on any wire connections.
I flipped my card over and added it to a top folding card base. Then I finished decorating it. I added a sentiment that was heat embossed in white on black cardstock. I also added Copic colored stargazing children that I cut out using the coordinating dies. These kids are just so sweet!
Now that the card is completely put together here's a look at it with the lights off...
And, here's a look at it with the lights on... So Fun!
I wanted to make sure the recipient of this card would know where to push to light up the stars so I used a fine tipped marker to write, "PUSH," on the bottom left corner (where the button is).
I love making cards extra fun by adding lights and these EZ-Lights from Pear Blossom Press make it incredibly easy! If you'd like to check out more ideas on how to use these lights keep on going with our blog hop to see more creative ideas. To continue on with the hop just check out the list below.
We've also got a fun GIVEAWAY for you all today. There will be two lucky winners selected randomly from comment on the blogs. One winner will win a $50 gift card to Hero Arts and another winner will receive a $50 gift card to Pear Blossom Press. Those are awesome prizes so make sure you comment to enter as you hop along with us!
I hope you all think these light up cards are as fun as I do! Now I'm curious to know what you all have in your Hero Arts stash that you're itching to turn into a light up card. Let me know in the comments below!
Have an awesome day you guys!
Click on products to shop:
|
Leave a comment
Please login with your Hero Arts account in order to comment.
Click HERE to sign up if you don't have an account.
43 Responses
Sue D
January 28, 2021
Love that the sky lights up.
ava gavloski
January 26, 2021
Great presentation. Gotta love a big blue sky with stars.
Helen F
January 26, 2021
The addition of the clever little lights really take this wonderful card to the next level! Love it!! So special! Thanks so much for the great inspiration! Take care! :)
Stacey Kowbel
January 25, 2021
fabulous card! Love the lights as the stars!
Linda Smith
January 25, 2021
De-light-ful!!!!
sylvia a vicari
January 25, 2021
I love it. I may have to try light up cards again
Debbi Gleason
January 25, 2021
What a great card
Kelsey Thomas
January 24, 2021
What an awesome card!
Lauryne Cunningham
January 24, 2021
I love your card! These lights seem so easy to assemble on projects! I’d love to light up some candles on birthday cards!
Dana M
January 23, 2021
Oh what a wonderful scene! The light feature is perfect for your design – so fun!
Cassie
January 23, 2021
I really like your card! I love moon and stars, (I had my room decorated in them as a teen). I wish I had that stamp set.
Carol E. Wortman
January 23, 2021
What a precious card…. ❤ …This hop was so much fun. Revisiting so many of my Hero Arts favorite stamps gets the excitement and inspiration flowing all over again ! The EZ lights are like getting a fun gift in a card. The minute you see that press here spot It’s a fun game to try and figure out what will happen. Loved the talented DTs creations. Wonderful collaboration ideas!
Jenn Gross
January 23, 2021
I love stargazing! Fantastic way to use the EZ-lights in the night sky. Tfs
Debbie Warrick
January 23, 2021
Such a cute card. Love the way the stars light up. I know a couple of kids who would love this card. Thanks for sharing.
Kris Reeves
January 23, 2021
I love the enamel dots effect over the lights! Fun!
Dorothy Ayotte
January 23, 2021
I love light up everything. This seems so fun to make! Can’t wait to see all the ideas. I have the June 2020 Aurora Borealis kit which would be perfect for those lights!
Manda Leong Johnston
January 23, 2021
I love lights on cards – these are so appropriate!
Susan Carlson
January 22, 2021
Love this card & how you incorporated the lights with the stars! Thanks for the instructions!
Marisela Delgado
January 22, 2021
So many wonderful cards!
Marisela Delgado
January 22, 2021
Wonderful card!
Priscilla Bade
January 22, 2021
Beautiful card! I think it would be fun to light up a special Christmas card, such as one with a Christmas tree or the Floral Nativity set.
Meghan Kennihan
January 22, 2021
What a great idea! I LOVE the sky! What a great scene and light up!
Roberta S.
January 22, 2021
Maria, your card is so cute.
Jeannette Gaidawirth
January 22, 2021
This is such a neat idea! I love the color tones and light up effect. Great jog Maria!
Tanna Lohouse
January 22, 2021
So pretty I love the starry sky💕
Donna Phelan
January 22, 2021
Beautiful card! Loving all of your pretty inks! How cool is it that it actually lights up?!? Fantastic!
Joyce Mehrberg
January 22, 2021
Love those fun lights.
Denise Bryant
January 22, 2021
Great collaboration with Pear Blossom Press! I love this sweet card…. so special that it lights up!
Dee Earnshaw
January 22, 2021
love this night scene – great idea for using these fantastic lights
Sheri Kempke
January 22, 2021
Love this light up card, so cool. I’ve been wanting to try this for awhile. Thanks for a fun hop.
Sunshine HoneyBee
January 22, 2021
Revisited the 3 blogs not found earlier. Great hop.
Melissa
“Sunshine HoneyBee”
Glenda Dennis
January 22, 2021
Never thought about adding lights to my cards, can’t wait to try
Lindar C
January 22, 2021
What a fun card! I love EZ-Lights, they make light up cards so easy to create.
Debbie Selby
January 22, 2021
I love collaboration blog hops like this. It introduces new to me designers and provides an opportunity to re-use older stamp sets in new ways. I really appreciate that.
Amanda Stevens
January 22, 2021
How pretty Maria! I love this sweet card. And great tip with the clear enamel dots over the lights!
Emily Henry
January 22, 2021
Thanks for the great tips. I purchased some lights awhile ago and have not used them as I was not sure. You have inspired me to try!
Roxanne Tellini
January 22, 2021
This was a fun hop and I added some new blogs to follow. My favorites are Carissa’s Time for Cake and Mindy’s Galaxy Peek a Boo. Great use of the lights in both.
Jeanne Beam
January 22, 2021
What an awesome card! I love that it lights up and the colors and design is amazing…
Thanks so much for sharing.
Kailash
January 22, 2021
Love the creative use of this stamp set to light up, looks fabulous!
Janis Woolbright
January 22, 2021
Oooooh…how fun! What an exciting collaboration hop. I love the light-up constellations. Just starting this hop and am looking fwd to see everyone’s creations!
<3 J
jwoolbright at gmail dot com
HerPeacefulGarden.blogspot.com
Bunny Hoyle
January 22, 2021
I don’t own them but I think the “You Shine” would look good lit up.
Pocono Pam
January 22, 2021
Awesome card Maria!
Sunshine HoneyBee
January 22, 2021
Wonderful creations using the lights. There were 3 blogs unable to see/comment on so will ck back later.
Melissa
“Sunshine HoneyBee”