Mixed Media Love!
Hey everybody! It's Maria here and I am popping in to share a little bit of mixed media love with you today.
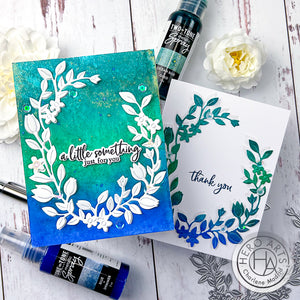
I started out by grabbing a background from my stash. I made it a while back using a fun technique with Hero Arts Inkers and rubbing alcohol. I squirted both Ultra Pink and Summer Sky Inkers onto my glass work surface. Then, using a mist bottle, I spritzed the inker with rubbing alcohol to both dilute it and spread it across my work surface. Next, I dipped a piece of Luxe White Watercolor Cardstock (A2 size) into the mixture and pushed it around until my whole piece of paper was swirled with color. This is such an easy way to make vibrant, colorful backgrounds and you can do a whole bunch at once so that you have ready-made backgrounds for another project (like I did for this one). To finish off this background I splattered it heavily with White Metallic Glimmer Ink. To do this, I put a little on my work surface, added a drop of water to thin it, then I splattered it onto my background with a paintbrush.

Next, I used a MISTI to stamp the Mini Hearts Bold Prints stamp onto vellum with Onyx pigment ink. Before the ink could dry I sprinkled it with clear embossing powder and heat set it. Before the clear embossing powder had a chance to cool off I grabbed a pinch of gold embossing powder and sprinkled it over the top of hearts and heat set it again. I tried to make sure that I wasn't completely covering the hearts because I really wanted the black to show through and for the gold to just dress it up a little bit. I cut the piece of vellum down to 3.25" x 4.75" so that the colorful background piece would still be visible as a border when I add the vellum.

Next, I used the Love and Florals Fancy Dies to cut the word "LOVE" out of Pitch Black cardstock three times. I glued the letters together so that there would be some nice depth and then I adhered them to the vellum using foam tape. I wanted the letters to be a little more eye catching so I used a white Posca pen (you can use a white gel pen too) to outline the letters and add three dots to each one. Once that was dry I flipped the vellum over and added foam tape to the back. I added it directly behind the die-cut letters so that the tape would not be visible through the vellum. I adhered the vellum to the colorful card base and that was it for this card!

I hope this card will give you some easy ideas on how to create mixed media cards of your own. If you try the Inker & alcohol background technique, or the pigment ink plus multiple colors of embossing powder, please let us know how these techniques work for you!
Have an awesome day and happy crafting!

|


Leave a comment
Please login with your Hero Arts account in order to comment.
Click HERE to sign up if you don't have an account.
1 Responses
Kristine Kerr
January 29, 2023
I love this colorful card! I would love to see me a video on how you do the background please. I’ve never seen anybody use alcohol and stead of water for ink smooshing💕