DIY With Debi: Embellished Phone Cases

Welcome back to DIY Wednesdays where it's all about discovering fun and different ways to use Hero Arts products. If you are new here, I'm glad you joined me this week. I'm Debi Adams and I'm all about expanding the bandwidth of your stamps, die cuts and stencils. Today I am showcasing how to embellish cell phone cases. These one of a kind, custom designed cases are perfect for gift giving and also make a great project for a "Friends Night Out" party, or for these times, perhaps a Zoom meeting! They can be as simple or as elaborate as you want them to be. I ordered my clear cell phone cover online which saved on time, gas and safety.
Somehow I started off with the idea I would make just ONE cell phone case. Once I got in the mode however, I kinda went full speed ahead. When the juices get flowing, it's hard to stop, right? You? Anyway, here are five different cases but I know you can make so many more!

To make the insert for the case, simply trace the cell phone case and window onto cardstock and cut it out. Make sure to try out the insert before applying any images. I found that mine had to be trimmed a bit on both sides. TIP: I used a corner rounder for the edges. I highly recommend only rounding one set of ends. When the other end is not rounded, the insert fits snugly into the case. If both sides are rounded, it is a looser fit.

The "Wonderful" Case

Let's start with the easiest cell phone cover. It only involves Canary cardstock, cut on an angle, embellished with Creamsicle Reactive Ink and adhered to the pre-cut, Dove White cardstock base. Thin stripes from gold poster board were adhered at a different angle onto the base and the sentiment was cut from gold poster board and adhered to the cover. Done! Easy. Clean.
Hero Arts Supplies
• PS325 Hero Hues Dove White Cardstock
• PS306 Hero Hues Canary Cardstock
• AF422 Creamsicle Reactive Ink
• M1002 Sponge Dauber
Other Supplies
Gold poster board, adhesive
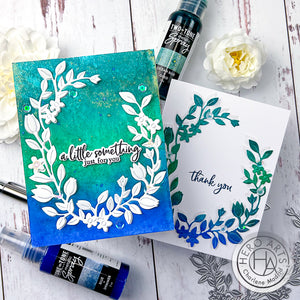
The "Hello" Case

Make case from Paradise cardstock. Die-cut various sizes of the palm leaves from Paradise cardstock and gold poster board. Embellish palm leaves with Blue Raspberry and Green Apple Reactive Ink. Layer leaves onto gold cardstock so that gold shows just a bit. Adhere to case base. Die-cut corresponding Dove White cardstock and gold poster board from Tag Infinity Dies. Stamp and emboss sentiment onto the Dove White cardstock tag. Adhere together and attach to case base. Trim sides if needed.
Hero Arts Supplies
• DI445 Tag Infinity Dies
• DI722 Paper Layering Plant and Stand
• CM413 Affirmation Messages
• PW100 Gold Embossing Powder
• VC250 VersaMark Watermark Ink Pad
• PS325 Hero Hues Dove White Cardstock
• PS312 Paradise Cardstock
• AF427 Blue Raspberry Reactive Ink
• AF425 Green Apple Reactive Ink
• CL032 Acrylic Block
Other Supplies
Gold poster board, adhesive, heat tool
Plants on a Shelf Case

This design uses the Bold Graphic Confetti Die for its base. Different plants, a bottle and a tassle swag were stamped, colored and cut out and set onto shelves made from woodgrain cardstock.
Hero Arts Supplies
• CM338 Hang in There Potted Plants
• DI615 Hang in There Potted Plants Frame Cuts
• DI493 Bold Graphic Confetti Die
• CM396 Pure Magic (Jar)
• CM436 Festive Balloon (Tassel Swag)
• PS325 Dove White Cardstock
• PS768 Decorative Woodgrain Cardstock
• AF345 Intense Black Ink
• MT310 MISTI
Other Supplies
Markers, adhesive
Peace, Love and Kindness Case

Lots of fun images applied to this case. Begin with stamping/die-cutting all images and then coloring them in with Copic markers. Adhere to base. Stamp small images (hearts and diamonds) onto actual base. Add detail marks to sun and banner.
Hero Arts Supplies
• My Monthly Hero May 2020 Kit (Sun, Flower, Rainbow)
• CM365 Cross Stitch Alpha Set
• DI739 Banner Letterset Fancy Dies
• DI342 Luggage Tag Alphabet Frame Cuts
• PS325 Dove White Cardstock
• PS323 Pitch Black Cardstock
• AF345 Intense Black Ink
• CL032 Acrylic Block
Other Supplies
Copic markers, adhesive
Orange You Happy Case

This black and gray cardstock case was stamped with the Orange Blossoms stamp set (leaves) using Unicorn Pigment Ink. The two pieces were layered together with the gray piece being slightly smaller than the black cardstock. The Orange Blossom cluster was stamped and cut out then embellished with Copic markers. The Orange Blossom die alone was cut from gold poster board, adhered to the underside of the Oranges, slightly off center and then glued to the base. The "Happy" sentiment was cut from both white and gold poster board, layered together and attached to the base.
Hero Arts Supplies
• CM414 Orange Blossoms
• DI725 Orange Blossoms Frame Cuts
• DC274 Congrats Happy Stamp & Cut
• PS325 Dove White Cardstock
• PS323 Pitch Black Cardstock
• AF345 Intense Black Ink
• AF249 Unicorn Pigment Ink
• MT310 MISTI
Other Supplies
Adhesive, gray cardstock, gold poster board, Copic markers
Oh, did I mention you can get carried away making these? Really a lot of fun and a great thing to do with friends and even with your kids. Hope you found something today that makes you want to create!
XO,


Leave a comment
Please login with your Hero Arts account in order to comment.
Click HERE to sign up if you don't have an account.
4 Responses
Barb D
June 19, 2020
These are so fun!
cjeannea
June 18, 2020
Were you able to more than one layer of cardstock?
Rain McKenzie
June 18, 2020
Those look awesome! I love the creativity and the uniqueness of the project. My brother and I have painted the backs of cell phones and adhered flat backs but I never thought to use my die cuts or stamps.
Denise Kitts-Wadlow
June 18, 2020
What a clever and creative idea!!! Where online did you find clear cellphone cases? I have never seen them. I would love to try this idea for some gifts for family members, and this is such a great idea for personalizing the cases to fit each one’s personality. Thanks so much for the inspiration!