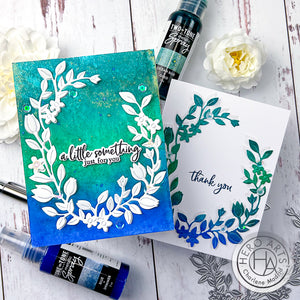
Creating a Masked Window for Stenciling
Hi there! Emily Midgett here with you today, and I have a project featuring lots of ink blending, including a masked, stenciled window created using the Leaf and Floral Stencil. I love using this technique to ground a focal point. Let's get started with the details!

I began by using some masking tape around the edges of my white A2 card front. I simply lined up the edge of my masking tape with the edge of my card front to make a neat frame around the edge. Washi tape or painter's tape works well for this technique! Before placing my stencil over the top of my masked card front, I used a blending brush to blend some Cotton Candy ink all around the edges, allowing the color to be concentrated around the edges and tapering off towards the middle. I think this adds a bit of dimension to the blended area.
While the masking tape was still in place, I placed the Leaf and Floral Stencil directly over the blended area, keeping it in place with a few more pieces of washi tape. I then blended Ultra Pink ink over the top. The darker pink ink shows up beautifully against the light Cotton Candy ink. I removed the stencil, then removed the masking tape around the edges of the card front, creating a pretty-in-pink stenciled window with a super crisp white frame!

I love pairing florals with lovely patterned backgrounds, and I love when ink and cardstock match even more, so I pulled out some Peony and Ultra Pink cardstock to create some die cut pansies to decorate the front of my stenciled panel! I die cut the different floral components to the Pansy Fancy Die set using the pink cardstock and the foliage from Shamrock and Pine cardstock. I blended Cotton Candy ink around the edges of the pale pink flower petals to add some extra dimension, then blended some coordinating Pine ink around the edge of the foliage. I adhered all of the die cut pieces together using Precision Glue.

I arranged the flower and foliage die cuts on my stenciled background and adhered them with both liquid and foam adhesive for some extra dimension. For the greeting, I wanted something simple and relatively small to tuck in amongst the foliage of my die cut pansies, so I die cut and heat embossed a greeting from Friendly Messages Bundle using the Watermark ink pad and some silver embossing powder. I nestled the sentiment amongst the flowers, then added a few sparkly pink gems to add some shine!
Well, that's all for this card today. If you haven't tried the magic of masking with your ink blending and stenciling, I highly encourage you to try it. It's super fun and removing your mask is positively magical! Thanks so much for stopping by today, and have a marvelous day!

|


Leave a comment
Please login with your Hero Arts account in order to comment.
Click HERE to sign up if you don't have an account.